If you’re thinking about getting Ombre Nails, you’ll want to realise how much are ombre nails? I decided to look into the going rate of different nails salons and gathered the required info.
These days, everyone is taking notice of how gorgeous you can seem when you wear ombre nails because they have become the new meaning of style and glitz in the cosmetics market. If you’ve always wondered about the Ombre nail style but haven’t yet given it a whirl, this article is here to answer your questions.
When deciding whether or not a product is right for you, consider things like the pricing, what you get for the money, and how long you can expect it to endure.
Make sure you have all the information you need about this design by letting us look into it further.
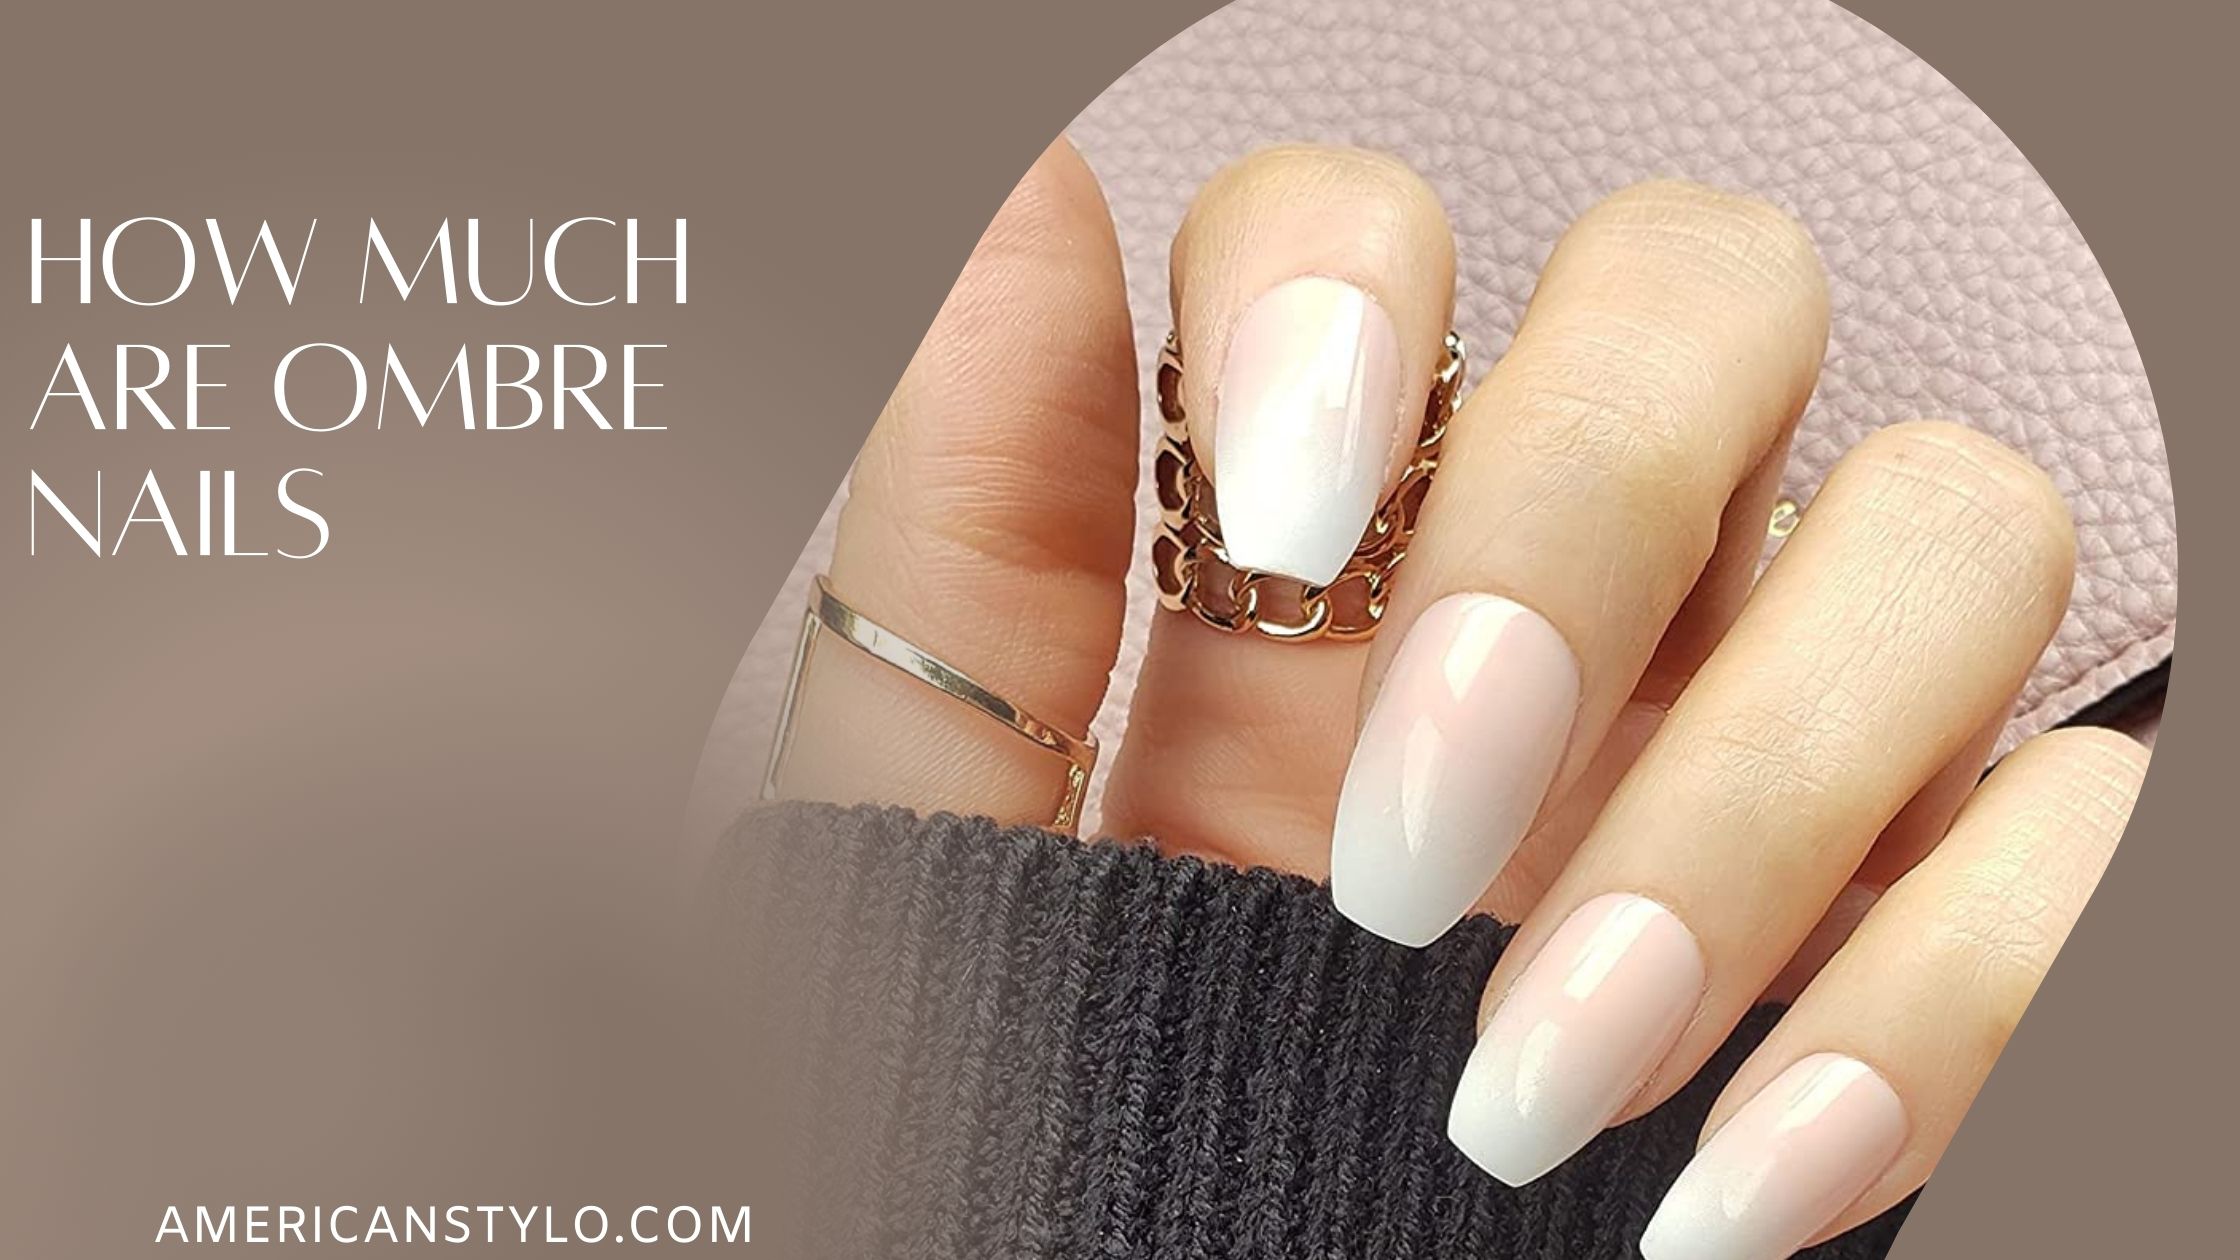
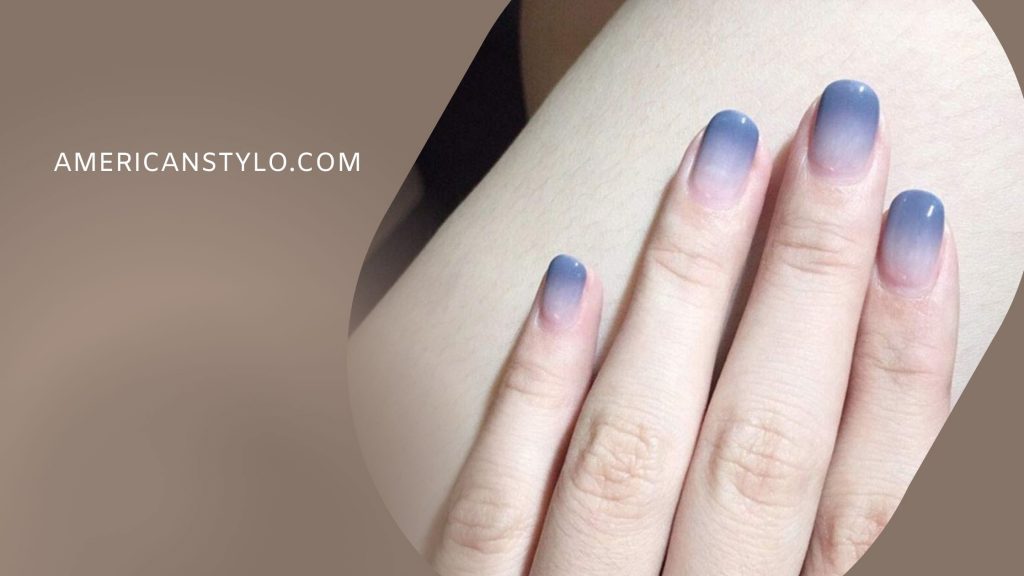
What are ombre nails?
Colour blending techniques are used to create ombre nails. Salons and spas frequently provide this design for customers to choose from. A simple manicure can be elevated by using ombre nails, which feature a wide range of colours and patterns.
An ombre manicure’s appeal is based on its vibrant hues as well as its shine and uniqueness. When it comes to applying ombre nails, patience and talent are required. When dealing with numerous colours and trying to get them to blend and fade together, a steady and delicate touch is needed. This is not a project that can be completed in a short period.
The truth is that merely painting your nails with different colours will not work. As an alternative, you can pay a salon to perform this design for you, which is more convenient and less time-consuming than doing it yourself. So let us dig into how much are ombre nails?
How much are ombre nails?
The cost of ombre nails varies widely, largely because of the manicure salon and/or professional you choose to work with.
For a single manicure, salons and spas charge anywhere from $45 to $75 for a regular set of ombre nails. However, the price can rise to roughly $55 to $80 for more brilliant and glossy colours. It’s because more expensive polishes and tools are needed to create a more complex pattern for ombre nails.
Customers have even reported paying as much as $100-$120 for the most extravagantly designed ombre nails.
For Glittery White, you may want to pay extra for an ombre nail job that includes glitter. When looking for a nail salon, it can be tempting to go with the cheapest option, but it is important to consider the salon’s reputation, experience, and the supplies they use. The health of your nails is more important than saving a few dollars. So, I hope now you have an idea about how much are ombre nails!
Do Ombre Nails Last a Long Time?
The ombre nail design has a variable life expectancy, with some people having it last for weeks while others have it last for months. The frequency with which you wash your hands makes a difference.
For example, a person who uses their hands a lot would have a shorter lifespan than someone who doesn’t use their hands much. Hence, make your investment worthy as you know how much are ombre nails!
However, if you use high-quality materials and apply them properly, your ombre nails should last about two to three weeks.
Nail experts recommend that you return to the salon every two or three weeks to fill up any gaps caused by the natural growth of your nails.
If you use ombre nails, you should remove them fully every two to three months so that you may give your natural nails a chance to heal and grow back healthy.
The Factors That Affect Ombre Nails’ Longevity
Ombre nails may be used in a variety of ways and are a great way to spruce up your look. If you’re looking for something that lasts a long time, these are the nails for you.
They do, however, require maintenance, just like any other nail art. If you’re not careful, they can be weakened, cracked, and come apart. They’ll fall off on their own in around two to three weeks.
You’ll start to see wrinkles and sags as they become older, and you’re not going to enjoy how they look. It’s going to look a lot like shattered nail art. It’s usually preferable to take them to the salon to get them re-done when they start to look shabby or faded.
There are a variety of things that might affect how long your ombre polish looks and lasts, including:
Weather
Experiencing dirt, wind, and rain on your nails is inevitable if you’re not diligent about protecting your hands and nails from the elements. However, the shine will be significantly reduced as a result of their gradual demise. When working outdoors, it is usually a good idea to wear gloves.
Regular work hours and routines
Your ombre nails may suffer if you have a job that necessitates a lot of hand-eye coordination. They usually don’t last as long and may start to fade after a week of being applied. One example is washing your hands too frequently, therefore you should always wear gloves when doing home duties and avoid wetting or drying your hands too frequently.
Not going to the nail salon
To avoid gaps from forming over time, it is recommended that you visit the salon every two weeks. Taking care of your ombre nails is the most important thing you can do to save money and time.
You’ll have to go to the salon a lot if you don’t take care of your ombre nails and it will be costly, as you know how much are ombre nails!
5 Steps , Quick and Easy How-To DIYs Ombre nail art.
Now that you know, how much are ombre nails! This is great news if you’ve been holding off on getting ombre nails done because of the high cost of having them done professionally.
A lot of different ways are available when it comes to Ombre nail art at home.
Ombre gel nails with sponge
You will need:
- Basecoat
- Topcoat
- Nail polish remover
- Three different hues from the same family (light to dark)
- Tidy brush
- Makeup sponge wedge shape
- Scissors
1- Starting with a Pre-Cut Sponge
Make the flat edge of the wedge makeup sponge narrower by cutting it to the size of your nail, as directed by Dunne, a nail expert. “The wedge should be no wider than the width of a human fingernail. Using this method will reduce the amount of nail polish that seeps into your skin.”
2- Use a Basecoat to Protect the Surface.
Dunne advises applying a basecoat to your nails. Before moving on to the following stage, ensure that the coat has completely dried.
To ensure that your manicure lasts for a long time, even if the nail polish claims to have a basecoat built-in, it is still recommended to apply a classic basecoat first.
3- Pick Out Your Ombre Colors
For best results, Dunne recommends using a wedge makeup sponge and applying each colour in a straight line. As you commence to build the wedge, start-up with your softest colour at the base. To get a smooth fading, you may want to brush some of the colours onto the sponge at the same time.
4- Make Your Ombre a Reality.
Apply the polish to your fingernails using a sponge “That’s what Dunne claims. All three colours must be applied to the nail. Your remaining nine nails (or those accent nails you’d like to make ombre) will follow suit when your first one is done.
To get the polish to cover the nail evenly, you may have to blot the sponge many times. Keep going until you’re satisfied with the outcome.
5- Use a Top Coat
You should apply top coat to your nails right away following sponge application, according to Dunne. This will help prevent chipping and also enhance the fade. As a result, despite your trepidation about reapplying a second coat of polish over your DIY manicure, we assure you that it will not ruin it. According to Dunne, “the topcoat can help blend the polishes.”
6- Tidy Up Each Nail
When you’ve finished painting your nails, use a clean-up brush to get rid of any polish that may have gotten on your skin “According to Dunne. Use a smaller, tapered brush (like Olive & June’s Clean-Up Brush) to neatly and easily touch up around and under each nail bed for the best results. It’s also important that you don’t mistakenly remove lacquer from the edges or tips of your nails when doing a touch-up.
7- Consider Your Cuticles a Priority.
To re-moisturize your skin, Dunne recommends using cuticle oil. When it comes to the area around your nails, acetone can be particularly drying. Olive & June’s Cuticle Serum is our go-to nail care product. Skin is hydrated and softened without becoming oily as a result of the formula’s rapid absorption.
How to make ombre nails with gel polish?
You may achieve the greatest results by brushing the polish over your nails and blending it in. Two gel polish colours and a lint-free nail wipe are all you need.
- You should apply and cure your base coat before painting the left side of your nail with one of your chosen colours, barely overlapping the vertical middle line.
- To blend your two colours, start by applying your second colour to your right-hand nail, and then use your polish brush to stroke downward along the centre line several times until the uncured colours begin to mix. Avoid colour transfer by wiping your polish brush with a lint-free nail wipe before putting it back in the bottle.
- Cure the first colour coat with an LED or UV lamp after removing any excess gel polish from the skin around the nails.
- To achieve a uniform colour and a well-blended middle, go back and repeat steps two and three.
- Apply a double coat of gel polish and the cure. Cleanse the nail and apply moisturising cuticle oil to seal in moisture.
5 Unique and Different Ombre gel Nail ideas/designs
Now that you realise, how much are ombre nails! You can make Ombre nails designs at home.
Ombre Nails with a Deep Red and Black Color Scheme.
The perfect Valentine’s Day manicure is one with red and black ombre nails. Alternatively, if you like a more traditional Valentine’s Day colour scheme, white and red can be used together. The deep crimson is a sophisticated and feminine colour choice. Here’s the step-by-step guide to copying this design.
Step by step Guide
Step 1: Allow the base coat to dry.
Step 2: Paint your nails a strong shade of red to serve as a base colour.
Step 3: On a sponge, paint on the same red and black nail polish. To produce an ombre look, apply it to your nails with a dab.
Step 4: Lastly, make sure to tidy up around the nails.
Step 5: A gel or matte topcoat completes the look.
Silver And Pink Glitter Ombre Nails
Glitter can be used to dress up a set of ombre nails. The accent fingernail is painted with a light silver glitter lacquer, which is the perfect choice for this design. It’s easy to make and maybe done with a variety of colours.
Step by step Guide
Step 1: Start with a base coat of white nail paint.
Step 2: Nail polish is applied to a sponge and then dabbed onto the nail.
Step 3: To make the ombre seem even more dramatic, repeat Step 3.
Step 4: Apply the silver glitter nail polish on your accent nail in step four.
Step 5: The next step is to apply a gel finish top coat to protect your manicure from chipping.
Metallic Ombre Nail Artwork
Do you want to spruce up your look? Make your nails stand out with this shiny ombre design. It’s not too flashy, yet it’s still really sophisticated! Try it if you’re planning anything spectacular.
Step by step Guide
Step 1: After painting your nails with glitter nail polish, wait for them to dry before moving on to the next step.
Step 2: Using liquid latex, cover the nails with a thin layer.
Step 3: A wedge sponge is ideal for applying black and gold lacquer to the edges of your nails.
Step 4: Apply a final coat of topcoat once you are satisfied with the ombre effect.
Step 5: Using acetone and a tiny brush, buff the sides of your nails clean.
Nail Art Using Ombre Sunshine Colors
If you’re planning a trip to the beach soon, consider sporting this ombre nail design. The vibrant shades of yellow, orange and pink come together to give you the look of a summer day in the sun.
Step by step Guide
Step 1: Protect your nails with a base coat.
Step 2: Allow the white base colour to dry before moving on to the next step.
Step 3: Liquid latex should be brushed around the nails.
Step 4: Using a sponge, apply three stripes of colour to the sponge, overlapping the colours slightly.
Step 5: Apply a thin layer to your nail and allow it to dry. Using a sponge, re-apply the colours and continue the process.
Step 6: To smooth out the gradient, apply one final coat on top.
Step 7: Peel the latex off. Using a brush and acetone, remove any excess acetone from the cuticle area.
Watercolor Ombre Nails.
A sponge isn’t necessary for DIY nail art, but you can still create something unique! You don’t need any tools to create these stunning ombre nails.
Step by step Guide
Step 1: Coat the surface with a base coat.
Step 2: Paint one-half of your nails with the first colour.
Step 3: Apply a second colour to the opposite half of your nail while the first one is still wet so that it doesn’t dry.
Step 4: Blend the same two colours on a glass basis with a brush.
Step 5: Create a watercolour effect on your nails by painting them with blended colours.
Step 6: The final step is to apply a top coat to complete the project.
Final thoughts about How much are ombre nails
Numerous variables, like the salon you visit and the colour you select, influence how much are ombre nails. You should be prepared to pay anything from $45 to $120 on average.
When it comes to getting your nails done, it’s always better to go for a reputable salon with experienced nail technicians that use only the best supplies. It’s not only good for your nails, but your ombre nails will stay longer and look better as a result. I hope that this post about how much are ombre nails will be helpful for you.


